Equipment Management
Get familiar with your Rugby wheelchair.
Introduction
This resource is designed to provide players, coaches and equipment managers the knowledge, instruction and walkthrough required to properly assess and navigate a rugby wheelchair.
These guidelines address the primary areas of concern and offer routine maintenance procedures that can provide a solid foundation for any equipment manager; this can be used for chairs at all levels of play.
Equipment managers should refer to the Owner and Maintenance Manual provided by the chair manufacturer with the delivery of the new chair or the manufacturers website. The manual may cover aspects of:
- Set-Up
- Routine Maintenance
- Do’s and Don’ts
- The Chair and Travel
- Troubleshooting
- Spare Parts
Definitions
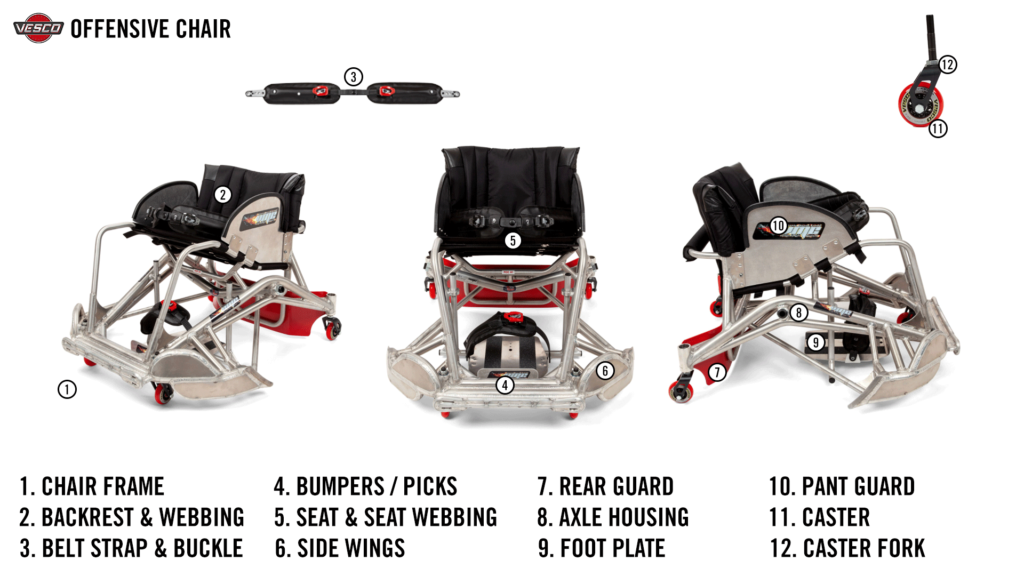
- Offensive Chair: Offensive chairs are set up for speed and mobility. These chairs have a low profile front bumper and wings to prevent other wheelchairs from hooking them. These chairs are used by players with higher classification (2.0, 2.5, 3.0, 3.5).
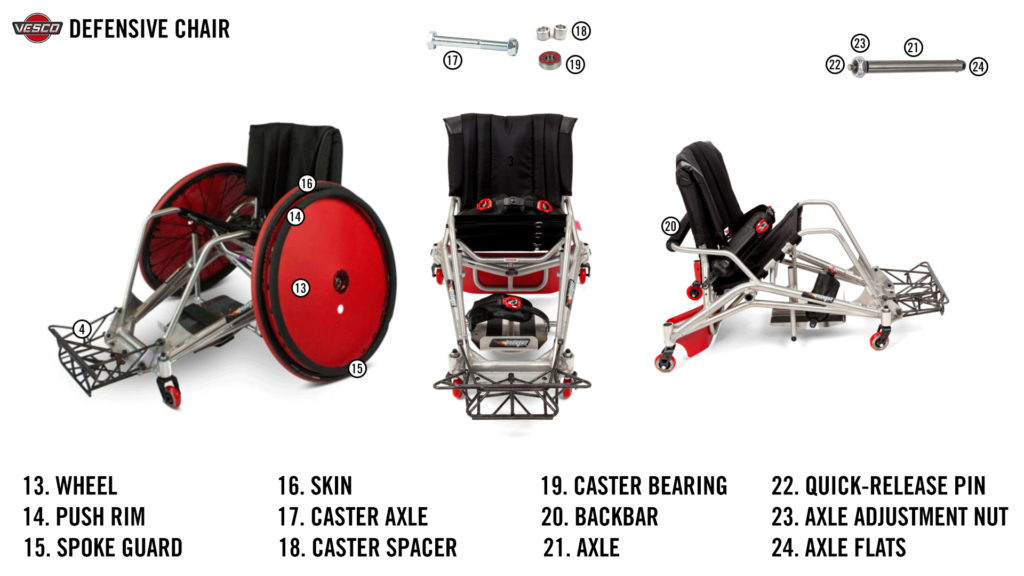
- Defensive Chair: Defensive wheelchairs have an extended front bumper set up to hook and hold other players. These wheelchairs are most often used by players with a lower classification (0.5, 1.0, 1.5).
- Upholstery: Adjustable fabric located on the seat bottom and back rest.
- Foot Plate: Vertically adjustable plate where the athletes’ feet sit.
- Casters: The front wheels of the sports chairs and safety wheels located at the rear of the chair.
- Caster Assembly: Fork, stem, wheel, spacer, axle and bearings.
- Anti-Tips: Safety castors located at the back of the chair designed to reduce the chances of the chair tipping over backwards.
- Lap Belt: Safety and performance best attached to the chair where the seat and backrest intersect.
- Dump: The angle of the seat relative to the backrest.
- Bumper: (pick-bar) Front part of both offensive and defensive chairs.
- Wheel: The large wheel on the chair. Standard Sizes are 24, 25” and 26”.
- Skin: The tire that goes on the wheel.
- Wing: Found on offensive chairs (some defensive) located at the bottom sides of the chair from the front castor to the wheel.
- Push Rim: Located on the wheel and is the primary point of contact for the athlete during their stroke.
- Spoke Guard: Located on the wheel to protect the spokes during chair-to-chair contact (the rules of the game state these are mandatory).
- Camber: Angle from the top to the bottom of the wheels that make the chair more stable in the frontal plane and help with transverse movements.
- Toe-In and Toe-Out: The symmetric angle of the main wheels relative to the line of forward progression of the chair.
- Camber Tube: V shaped bar that the wheel axles slot into.
- Axle: ½” X 4.25” or 5/8” x 4.57” shafts that connect the wheel to the chair.
- Quick Release Pin: Located on the top of the axle, compression of it allows for quick removal or attachment of the wheel to the wheelchair frame.
Diagrams – Chairs Explored
General Inspection
- Check tires for air pressure level. Most players prefer an air pressure of between 120-140 PSI for standard tubes and 220-260 PSI for high pressure tubes. Repair and or replace any tube that fails to hold the desired air pressure.
- Check wheel spin, looking for any limitation to the free smooth running of the wheel. For adjustments refer to wheel maintenance procedures in this document for “how to”.
- Check axle depth to see the amount of play or travel there is in the wheel axle. There should be approximately 1-3 mm play in the axle/ wheel depth. Refer to the axle maintenance section of this document for “how to”.
- Check axle removal. Look to see that the axle can be easily removed by compressing the centre pin and ensure that the axle slides in and out of the housing easily. Once again refer to axle maintenance for direction on “how to”.
- Check condition of all 4 casters: does the caster spin freely, does the caster fork spin freely. Adjust and or clean as required. Refer to caster maintenance procedures in this document for “how to”.
- Check rear guard and footplate attachment hardware for any loose or damaged parts and tighten as required. Be sure rear bar is padded for protection and rule compliance.
- Check the frame for any weld cracks. Flip the chair on its back and visually inspect the underside of the chair with specific focus on the caster housings and surrounding welds. Refer to the weld inspection section of this document for the ”how to”. Tighten or replace all screws, bolts & nuts on belts, ratchet strap buckles, bumpers and rear plastic guard.
- Inspect spoke guards/push rims for missing rivets/damage and repair as required.
Game-Day Inspection
Note all major repairs and adjustments should be attended to and completed well in advance of a game-day inspection. Ideally, a game-day inspection is simply a confirmation checklist to ensure the chair is ready to go.
Game-Day Inspection
- Check hip belt anchor points
- Ensure rear bar is padded
- Axles checked for ease of removal
- Main wheels spin freely
- Caters spin freely
- Casters are free of debris
- Tire pressure is appropriate
- Check rear guard and footplate is secure
- Check to see that the spare wheel is ready for each player and replacement tubes are available.
Chair Maintenance “How to”
Wheels
Check offensive chairs’ fenders to ensure push wheels spin freely and there is no rubbing on fenders. If there is rubbing, first check the wheel is on properly and has no irregular bulges that may be causing the binding. If the wheel checks out as functional, isolate the area of friction and remove the friction point via file or metal grinder to allow a free spinning wheel. Defensive chairs don’t have the same pinch/ rub points due to their frame design, but always check that the wheel is free spinning.
Push Wheels
These wheels are the most common part of the wheelchair to require attention. These wheels are easily removed by pushing in the center button on the axle and pulling the perimeter of the wheel. It is important that the axle comes out of the axle housing with nominal resistance to allow a quick change if required during a game. Check that the tire pressure is within the desired range and pump up as required. A tire can be pumped up while still on the chair but it is much easier to do this with the tire removed.
Axles
There are 2 sizes of axles of 5/8” or 1/2”. The 5/8” (recommended) is definitely the most common size and is much more stable and less apt to bend. If your chair has 1/2” axles it might be best to upgrade to a 5/8” version. Axles are an integral part of the chair and require maintenance, but once they are bent or marred in any way they should be replaced because of the tight tolerances between the axle and the axle housing. Clean off the excess lube from the axle using paper towels. Pull the axle out of the wheel and slide it in and out of the housing to determine if there is any dirt in the axle housing. If there is any catching, clean the axle as best as you can and re-check it by sliding it in and out of the housing, wiping it clean each time it is removed. Be sure to check the axle housing using both axles to ensure the option of switching axles following a repair. Note, there are tools designed to clean out the housing but these are specialized and quite difficult to use, so the more practical option for a sticky or grabbing axle is to replace the axle. Difficulty inserting the axle, removal of the wheel or the wheel rubbing on the wing (in offensive chairs) may indicate a bent axle which should be straightened or replaced (hyper-inflation of the tires may also cause the tires to rub on the wheels).
Axle Depth Adjustments
This adjustment is done when it is determined that the wheel has either too much play on the axle or the axle is not locking into place on the chair. To make this adjustment, remove the axle from the wheel, place a wrench on the axle nut and another on the axle flats which will act as the stabilization point. Adjust the nut in or out as previously determined and check the play once the wheel and axle are in place on the chair. Adjustments should be subtle (approximately 1/4 turn of nut at one time).If the axle is not locking into place, the axle length is too short and needs to be lengthened. If there is too much play in the axle/ wheel, the axle is too long and needs to be shortened.
Flat Tire/ Tube Replacement
This is a very common task for an equipment manager- replacing a flat tire/ tube. When you hear a distinct popping sound during the game it’s really only one thing- a tube has been punctured. Once you change the players flat tire with their spare it’s time to replace the flat tire. If the tire blew as a result of a hit or collision it’s wise to check the outer rim of the skin for a cut. The cut takes place from a hit of another chair (commonly the pick) and literally cuts the skin and punctures the tube. You want to identify this puncture spot so that you can put a patch inside the skin to prevent the new tube from bulging out the cut and obviously being highly susceptible to blowing. If you find the cut in the skin mark it with a magic marker line so you know where to place the patch. (See patching section on how to manage this situation)
To replace a blown tube you will need 2 tire irons to pry the skin off the rim. Wedge one of the irons down between the tire and skin and hook the bead of the skin and pull the iron down and clip it onto a spoke. (note don’t start the tire irons near the air valve as that area is too tight to easily work for this procedure) Once the first iron is in place insert the second iron about 5 cm away from the first iron and pry back as previously done but do not hook the iron to a spoke rather pull out this iron and move it along another 5 cm and repeat the pry. Continue to repeat this same procedure until the skin is free of the rim and or you can pry the skin off with your fingers.
Now pull out the ruptured tube and discard. Get a new tube the same size as the one you removed. Remove the thin screw nut on the tube valve and discard. Insert the valve pin into the hole in the rim, you will need to pry back the skin and tuck the tube into place. Tug on the valve from the spoke side of the rim to gently seat it and then tuck the tube into the skin all the way along the skin, next work the skin’s bead into the rim starting near the valve. Work the bead into place until you end up with about 10cm of the skin bead unseated. You will need to carefully insert a tire iron into the rim and gently massage the skin inside the rim. It is recommended to use plastic irons for this with a smooth and broad tooth so as to minimize the odds of pinching and or cutting the new tube.
Once you have the new tube in place inside the skin and rim take a moment and push the valve into the skin to better seat it in the skin and rim. Now inflate the tube to about 60 PSI and check that there are no bulges forming and the skin is in place all around the tire. Assuming all looks good you can continue to pump up the tire to the desired pressure or you can release the pressure and restart the inflation to the desired PSI.
High Pressure Tubeless Tire Replacement
These tubes are an all-in-one tube and skin (no separate tube or skin but rather a one-piece tube and tire). When a high pressure tube ruptures, they cannot be repaired. The upside is that they are easy to replace as you simply need to roll the tube off the rim by pushing it over the small rib on the rim and pull it away from the rim. Place the new tube on the rim by inserting the valve first and push the tube into place around the rest of the rim. They require 200+ PSI to function properly. These tubes are extremely costly, so be careful with their storage.
Tires
Vesco chairs are supplied with two brands/ types of tires:
- KENDA’S: Kenda tires are made with a silica compound in the tread to reduce rolling resistance and a thicker sidewall to resist pinch punctures (pinch punctures are caused by chair to chair contact). There is nothing to be gained by ‘hyper-inflating’ these tires over 120 P.S.I. In Fact doing so will only stretch the tires and cause possible tire to wing clearance issues.
- SCHWALBE’S: These are high-performance tires that are equipped with smooth sidewalls, which are also thicker than Kenda’s to further resist tire punctures. There is a maximum recommended PSI of 145 on these tires. They feature particularly hard wearing “Black ‘n’ Roll” central tread compound.
Air Pressure
There are 2 types of tubes and 2 types of inflation valves that are commonly used in wheelchair rugby. There are low pressure tubes (regular) which generally have a schrader inflation valve and the other type is a high pressure tube which always has a presta inflation valve. Low pressure tubes sit inside of a tire or “skin” but the high pressure tubes are both tube and skin in one unit.
Patching a Cut Skin
When checking the air pressure in the tires, do a visual inspection for any cuts or small slits in the tire skin. If a cut in the skin is noted, mark it with a magic marker line which will indicate where you need to place a patch inside the skin. A patch can be made of an old high pressure tube cut into a length of approximately 5 cm and slit down its base to create a “C” shape that will wrap around the new tube. Another method is to use three separate 5cm lengths of gorilla tape (or similar) and lay it inside the skin so as to cover or buffer the cut in the skin. To be clear this patch is positioned inside the skin in the area marked to block the cut area of the tire skin. This patch does make the installation of a tube more challenging but simply be patient when installing it and be careful to ensure the skin bead is well seated in the rim. Next inflate the tires to approximately 120-130 lbs. for regular tubes. For high pressure tubes there is no option of patching, if a high pressure tube is punctured, it is of no value beyond becoming a source for the previously mentioned 5 cm lengths of patch material. Finally check for a clear and free spinning wheel once it is in place on the chair.
Casters
Check to see if front and rear casters spin freely in both planes of rotation, side to side as well as forwards. Look to loosen the axle nut if the caster wheel is not free spinning. By either tightening or loosening the axle and nut while checking the degree of spin you can find that balance of free spin and little if any play within the axle fork. If the caster is still not free spinning after this adjustment you may need to remove the caster axle and assess the bearings and state of axle dirt/ hair. To remove the caster wheel you will need a set of two 1/2” wrenches or some vise grip pliers.
Oftentimes bearings get dirty or wet and rust, both of these scenarios result in a deficient caster function. The other common source of compromised caster function is hair in the axle. Depending on how compromised the bearing action is determines the maintenance required. Oftentimes a quick removal of the hair along with a bit of spray lube will do the job, other times removal of the caster wheel is required. The removal of the caster axle will allow an opportunity to fully assess the caster bearings. Take the nut off the caster axle then slide the axle out of the caster fork and this will allow you to clean the axle and assess the status of the bearings. Note that there are 3 spacers in most caster, 1 on each side of the caster wheel and another between the bearings inside the centre of the caster wheel. Be sure to align all of these spacers when replacing the caster wheel and axle. Be sure not to over tighten the nut on the axle as this will bind the free spin of the caster so tighten the nut as much as possible but while still allowing free caster wheel spin. Be sure to check all 4 casters.
Caster fork rotation or side to side caster rotation is another motion to check on the chair. Check for any binding in the side caster spin by rotating it by hand with a spinning push. This is a more subjective assessment and a bit tougher to determine how much to adjust for. Look for the caster to spin around a full rotation without binding. If it does not freely rotate at least one rotation you have to back off the top nut and assess the ease of spin as you back off the top nut. The nut is located inside the top end of the caster housing. Some chairs will have a plastic cap on top of the housing and this will need to be pried off with a screwdriver. A chainsaw spark plug wrench works perfectly for this job, a 3/4” socket will work as well. Simply hold the caster wheel and fork in one hand and stabilize it while loosening the nut and checking the ease of spin. Using this method adjust the fork caster spin making sure not to loosen the caster nut too much or this will make the caster fork unstable and will result in fork wobble. This procedure is repeated for all 4 casters.
Caster Cleaning
Casters pick up a lot of material from the gym floor. The build up of grim on the casters can limit the function of the chair and can be distracting/ annoying to the player. It is similar to catching on a dragging piece of material on your shopping cart wheel. The simplest method of cleaning casters involves the use of brake cleaner. Brake cleaner is used in the automotive industry to do just what the name implies- clean brakes but it also cleans casters.
It should be noted that it is recommended that brake cleaner be used with some caution, good air flow in the air you are working, wear moisture resistant gloves and spray it onto a dish scrubbing pad vs spraying it on the caster directly. Brake cleaner is available at most any automotive store, the scrubbing pads are readily available at any grocery store or similar and the gloves at any hardware store.
It’s recommended to tip the chair on to its back to allow easy access to the front casters and flip the chair the opposite way, leaning against a wall to get at the back casters. The primary grim that builds up is sticky and that then collects dirt and dust. Spray the brake cleaner directly onto the scrubbing pad and with your gloves on hold the caster with one hand and simply scrub the caster with the wet section of the scrubbing pad. Clean the whole caster circumference and repeat for the remaining casters.
Chair Rocker / Rear Anti-Tips
The degree/ amount of rocker in a chair or the front to back tip is another adjustment that may be requested by a more experienced player. Adjustments are made when it is determined that the player is rocking either too far or too little forward or backward while pushing the chair. This extra movement or lack thereof will affect the efficiency and/ or the quality of the push. Another reason for this adjustment would be if casters are catching the floor surface unevenly. The height of a caster can be altered by removing the caster fork and placing or removing a washer/ spacer that is positioned between the fork and the base of the caster housing. Most chairs have spacers both top and bottom of the caster fork so you can remove a spacer/washer from either top or bottom and use those spacers to achieve the desired height.
Caster Bearing Change
The need to change out a bearing in a caster is based on the quality or freedom of the spin. This concept was referenced previously in the Caster section. To remove the compromised bearing from a caster, one method is to use a tapered shaft of chisel or punch that will fit inside the diameter of the bearing. Slide the shaft into the bearing and tap the end of the shaft lightly so as to pinch the bearing and turn the caster over where the other end of the shaft is sticking out. Now tap the narrow end of the shaft and this should dislodge the bearing. Repeat this process for any other bearing that needs to be removed. Replace with a fresh bearing, to seat the bearing, settle the bearing in level and tap into place evenly with light taps. Be sure to place the middle axle spacer into the caster if it was removed during the bearing change.
Chair Welds
With the heavy collisions that routinely occur the chair frame is stressed. Welds are the most common areas of stress cracks and should be visually inspected well in advance of a major competition (and at least once a month regardless of competition frequency). To do this, position the chair on its back and use a flashlight to check each welded joint of the frame for cracks which present as thin slightly darkened lines. If you spot a crack line in a weld mark it with a black magic marker by circling it. Depending on how significant the crack is and your timeframe, take the chair to an experienced aluminum welder for repair.
Seat and Back Upholstery
Both the seat and back upholstery are adjustable via Velcro strapping. Changing the strapping by either shortening or lengthening will raise or lower the respective upholstery. The need to adjust upholstery is usually based on how the player sits in their chair and their comfort or functional height/ position.
If you do adjust the strapping it is recommended to mark the original Velcro strap position with a silver magic marker for reference if adjustment is ineffective. Note any adjustments made should be subtle (approximately 2-3 cm). It may take a few weeks for the upholstery to fit the player.
Caster Assembly
As previously mentioned it is helpful to keep your caster wheels free of accumulated debris from the gym floors as it increases your rolling resistance. Avoid running into curb cut-outs if pushing the chair outdoors as this may bend your front caster stems or damage your caster stem bearings. If you find your caster forks are not rotating smoothly, you may need to replace your cater stem and/or bearings. When replacing a bent stem bolt, make sure to note the number of spacers/ washers on the assembly to ensure correct rocker balance upon reassembly. It is recommended to use Blue $242 Loc-Tite on both lower jamb nuts. Tighten upper lock-nut until snug and check if the cater is freely spinning, adjust as required. Note: if the nut is too loose, it may cause cater flutter at higher speeds in which case you may need to slightly tighten the lock nut.
Footplate Adjustments
This adjustment is quite simple, there are 2 Allen key locking-screws that hold the footplate adjustment bars. It is a matter of loosening these screws and sliding the bars up or down as required for comfort and or balance of the player. Once you determine the bar height, tighten the locking screws. You may need to use a rubber mallet to move the bars and be sure to adjust the heights symmetrically. It is recommended to mark the original position before you adjust.
Tools Required
- Tire Irons (Tire Removal Tools)
- Adjustable wrench (7/16”, ½” & ¾” combination wrenches for Vesco Chairs)
- Metric and Standard size Allen key sets (1/8” and 3/16” for Vesco Chairs; Melrose chairs use metric fasteners. (Vesco uses standard fasteners).
- ½” and ¾” Socket and Ratchet (for Vesco Chairs)
- Screwdriver with assorted bits.
- Spark Plug tool for a chainsaw, (socket ends work great on caster shaft nuts and caster wheel bolts/nuts).
- Metal files. (Flat and rat tail)
- Scissors
- High Pressure Air pump (with Gauge)
- Rubber mallet
- Spoke Wrenches
- Hammer
- Tapered shaft (bearing removal)
- Open end wrenches 1/2”, 3/8
- #242 Blue Loc-Tite and #271 Loc-Tite
- ¼” or Larger Cordless Drill and bits
- Channellock Pliers
- Vise Grips
Additional Tools & Equipment
- Pipe Cutter / Hacksaw
- Tire Lever
- Wiss Snips
- Steel Strapping
- ½ Pipe Insulation
- Gorilla Tape
- Electrician Tape
- Brake Cleaner
- Scrubbing Pads
- Paper Towel
- Chair Check Gauge
- Magic Markers
- Ball Inflation Pins
- WD40
FAQ
What should spare-parts consist of?
One role an equipment manager may be required to do is to remind players to carry spare parts (particularly in competition). At a minimum a spare-parts list would include:
- A spare wheel complete with spoke guard and push rim (two wheels are better)
- One complete castor assembly
- Two castor stem bearings
- Two castor wheels
- Two Spare Axles
- One Spare Tire
- Two Spare Tubes
What are the rules of Wheelchair Rugby?
How much time is an Equipment Manager permitted on court?
One (1) minute for equipment repairs.
For additional parts and accessories: visit Vesco, Wheelchair Rugby Canada’s preferred supplier.